Pages

Saturday, December 21, 2013

Christmas Card Gallery

Here they are! Next year I will start earlier... next year I will start earlier...


John asked me for three cards for his golfing buddies- he had gotten pictures to share with them. I just love when he asks me to give him cards. I guess I don't embarrass him with my cards :)  I am still feeling a bit unsure about my creativeness... So this is the first one that I made...


SU Crumb Cake is the base for this card. The Lil' Inker snowflake die is cut in silver glitter paper with a jewel in the center attached with foam squares. SU Poppy Parade paper is over a patterned red striped paper. The final touch is the white ribbon. The PTI sentiment is embossed with white embossing powder. Inside is stamped "Merry Christmas" in Poppy Parade. This card was not difficult to mass produce :)


This card is cut with a circle die and then the white layer is embossed with the snowflake embossing folder.  PTI's Rustic Wreath die was used to cut two wreaths, one in SU Always Artichoke and one in a matching DSP pattern. The two are then woven together and glued around the circle. The sentiment  "From Our House to Yours Merry Christmas" is stamped with red on vellum and then embossed with clear sparkly powder- then attached to the back of the front. I added another wreath to the other side of the vellum - I don't like the unfinished look without it!

Three glitter snowflakes, white ribbon, red dotted ribbon and some red small circles are attached to the wreath to finish off this card. The inside sentiment was embossed with white ... "and a Happy New Year!"


This happy fellow is so pleased that we did in fact have some snow at Christmas when the family came home. These are PTI Snow  stamp and die set, SU Cold Play and SU Perfect Presentation stamp sets ... and the glitter paper snowflakes added the perfect touch! It always makes me smile to see how placing the smile and carrot nose can change the whole sense of the card!


This card was so fun to make! I used PTI Polka Dot Parade #9 stamp and die set to make the tree. When the card is closed, the tree comes together. 

The die is actually cut three times, whole on the white front of the card, on patterned paper and SU Always Artichoke. To assemble the tree, a patterned layer was glued to the space between each layer on the white card, leaving the cut to show through the card. Then a green layer was glued on the inside of the card to match the openings, so when the card is closed you can see how the tree comes together. 


The PTI Merry sentiment was a clever idea from Kristina Werner's blog... The stamping is actually two generation stamping in the same color, and then embossed in white on the same color paper. The paper is put over the middle sentiment with foam squares. Love the look! The embossed snowflakes on the card were a detail I probably could have done without,  but the bling was needed with the snowflake!

The inside sentiment says SU  Merry Christmas ... the words " from our house to yours" are divided between the layers of green inside the card that are hidden when the card is closed. 

I made 50 cards from these four patterns and had such a great time, although the time crunch gets me every year! Next year, I will start earlier.... next year, I will start earlier...

Friday, December 20, 2013

Grandkids Christmas Cards

Christmas is such a fun time for the kids! The grandkids get cards that are reflecting this wonderful season through a child's eyes...


Santa and Rudolph are peeking in the window at each house... The pictures on either side of the windows come from Shutterfly orders on the beginning page and I save them for projects just like these. Kodak used to give a thumbnail of every one that you ordered but now you can only get the first and last picture from the order. The colors are SU Always Artichoke and SU Real Red.

The window die is cut through the card base, then a piece of plastic is used before the window is attached. Googly-eye Rudolph, from the SU owl punch, is actually attached to the plastic so he stays on the window when the card is opened. I used the SU Stocking Punch and stamp set to create the stockings hanging with clothespins. Santa is on the inside with the sentiment and snowflakes from silver glitter paper. 

The garland is made with PTI's Rustic Wreath die cut open, one in DSP and one in Always Artichoke. Then I wove them together for extra strength!


Love the PTI sentiment  "It's the most wonderful time of the year"   and  SU Merry Christmas!


Monday, November 25, 2013

Thanksgiving Cards

While I don't usually send cards at Thanksgiving, I did send one to my mother at the nursing home and one to a friend who could use a positive mailing. Love the PTI Gobble, Gobble stamp and matching die set...

Here's the cards:

Love the sentiments stamped around the outside of the card. The acorns are from the SU Autumn set and fussy cut to complete. I used the white pen to outline the tips of the tail feathers... maybe I have been watching too much Kristina Werner, because I really didn't need too! I used SU chocolate chip for the base, and a polka-dotted orange first layer under the pumpkin pie top layer.


I like the cream color so much better than the orange on the mat. The DSP is from SU in chocolate chip.  The mat is die cut from Lil Inkers and I really love the look! I made the tail feathers with Distress inks and water, then die cut the shape. Love the random look of the gobble in orange, first and second generation prints. Twine finishes off the acorns across the bottom of the card.

Oh my! I haven't started my Christmas cards yet... happens every year!


Tuesday, November 12, 2013

Emma Rose is 8!

So hard to believe that Emma Rose will be eight on November 19th. She is really amazing and I just couldn't be more proud of her! Emma has always had a special affinity for My Little Ponies and now Equestria Girls... So I tried to add that to her card. Not my most successful addition... But my heart was in the right place :)

Here's the card...


Rarity is the name of the pony... which transforms into a girl.  This is another Magic Window card, with Rarity showing in the plastic window. The words "happy birthday" were diecut on gold vellum (hard to see in the picture). The base of the card is a patterned heavy cardstock with raised flowers. The added 8 candles are die cut with the tips embossed with gold embossing powder to look as though they are lit, then attached to the base with foam squares. I used Silver Stickles to make dots on the candles to match with the paper.

The ribbon has an "8" die cut and tied in the center, matching the pull at the top of the card to reveal a surprise when pulled up.


Rarity transforms into Emma by cutting and inserting Emma's picture to match the image on the front. The letters for her name and age are diecut using the patterned paper from the card base. The whole "Not Quite Navy" piece was then covered with Crystal Effects to give added shine. The heart-shaped bling in Emma's hair added just the right touch! 


The back of the card has a little embossed gift card from Simon Says Stamps die Circle Card Border, "Love U" was gold embossed from the matching stamp set. The clasp in the front was diecut with Avery Elle's rounded diamonds.  Inside is...


... an envelope (die cut in vellum) from SSS small envelope die which is holding an iTunes gift card! Love how that worked out! 

So I guess while this isn't my favorite card... I am hoping that it makes Emma Rose, my little artist granddaughter... smile!


Friday, November 8, 2013

November

We have two November birthdays on our family, Avery Neal will be 3 years old and Emma Rose will be eight! Avery is really into Doc McStuffins and Emma is fascinated with the Equestria Girls! So my task was cut out for me...

I knew I wanted to do the Magic Window Cards for both girls. Trying to get the logistics of how the card could work with their faces in the characters was tricky for me. But here's what I ended up with...

November 4th for Avery Neal:


I followed the Magic Window card pattern. After cutting the window I inserted an image of the Doc from the web, separating the head and gluing it on the white paper inside the window. The body I colored and glued to the inside of the plastic overlay so it would match up with head of Doc McStuffins when the card was closed and...

Avery's face which was on the white inset connected under the plastic sheet by the ribbon, when the card was opened.  Crazy right? The next picture shows what the card looks like when extended on both sections. The line on the picture is actually the plastic when it is pulled all the way up. 

Because the image was bigger than the original Magic Window card insert, this insert is longer, 2.75" x 4" which made it fit perfectly! Avery was over the moon with excitement about the card! Almost as much fun as her present... almost! The cupcakes are from SU's Create a Cupcake stamp set and punch. The frosting is on vellum and a little bling star is on each of the three candles. Again I used the alphabet die from SU and the number die from Avery Elle's Count on It for the sentiments, along with PTI's Bigger Bloom's "Best. Day. Ever."

The card is closed at the bottom with three purple flower brads. Because this is a card that doesn't open, we wrote our message for Avery on the back. My next post will be Emma Rose's Equestria Girls!


Saturday, October 26, 2013

October- Happy Halloween!

No October birthdays in our family... but there is Halloween! Love to make Halloween cards because the grandkids love them so much!


Our eight grandchildren live far enough away that we don't get them to trick-or-treat... so I add the treats in my cards! As a matter of fact- we don't have ANY trick-or-treaters, being a bit off the beaten path. I also send a card to Mom just because she gets a smile out of mail...


Here's one of the eight grandkid cards ...


There's a lot going on with this interactive card! I used the SU Booglie Eye stamp set for the cute little characters, PTI's Mighty Oak stamp and matching die for the tree and Movers and Shakers die and zipper die with the embossed white pull stamp. Notice the little eyes peeking out from near the witch?


When the arrow on the bottom is pulled out, the three trick-or-treaters move across the card and out pops BOO! with a hidden googlie-eyed bat! 

The top has an embossed white arrow with a pull direction too. It works with PTI's Zipper die which I used on DSP.  It has a hidden message underneath which says, "Trick or Treat" or it might say "Halloween is a Hoot" depending on the grandchild! 

The inside sentiment is Happy Halloween embossed with gold embossing powder.

I made eight different cards using the same design, so each message was a little different to give each kiddo a surprise opening. The response from them has been fantastic! I also used some inexpensive Halloween paper to make envelopes with my new envelope maker... So fun! Here's a quick look at 5 of them...

Next... Here is the card that I sent Mom...


This is a Fancy Fold card which gives three panels.  This is the card closed. Although I have used this design before, I changed the dimensions for this card. The base is 4.5" x 10.5", scoring each end at 1.75", 3.5" making the card just a little smaller than Lyla's birthday card (my June posting). 


The front face - First layer ...I added a 4x3 black panel on the first flap, then a DSP, and the Madison window in black with the opposite DSP underneath it. The corner spiderweb is embossed on vellum with the Booglie eye spider, colored with Black Wink of Stella pen. PTI's Trick or Treat die is attached to a piece of vellum. The picture is ok, but way more impressive in real life!


Here is the opened card, showing all three panels. Different Halloween patterned papers cover the panels and then Halloween Hoot stamp set and fussy cut the pieces on the card. Sorry the pictures don't do it justice... 


The sentiment is gold embossed on the black base, and the witch is colored with markers and my new favorite Wink of Stella pens!


The stamp set is SU Halloween Hoot and I just love the witch with the ability to have her carrying signs, the broom or the owl! She also appears on the envelope front... Happy Halloween!

Sunday, September 22, 2013

Thinking of you...

My college roommate and I have connected over the past year after quite some time and it has been such a joy for me. September brings sad memories for her as nineteen years ago her husband lost his battle with cancer at such a young age. I have been thinking about her quite a bit lately and sent her this card...


I used Papertrey Ink's Mini Bloom coordinating stamp set and matching dies. I just love the clean and simple look of this card! The sentiment also came with the set. 

All of the flowers were stamped on another sheet of white and then added to the card base. The ink colors I used were SU Melon mambo, tangerine tango, pear pizzazz, always artichoke, summer sun, and raspberry fizz. My second photo shows the layering of the flowers. The dimension with the foam dots and round corners with the corner punch added a touch...  Hope she likes it!

Sunday, September 15, 2013

Campbell is 4

It is hard to believe but our granddaughter Campbell will be four on September 27th. She is named for her great-grandmother who turns 90 on September 24th. Cami is an amazing little girl, just the idea for her birthday gives you a hint...

Cami wants a pirate-princess birthday party. You must dress up as one or the other; or because she's from Boston- a Boston Red Sox fan will do!

So here is my card for her:


Of course I had to use the magic window card (directions Magic BirthdayCard )! The stamp set is SU's Birthday Beauty. I created four cupcakes with Create a Cupcake stamps and dies, running the bottom of the cupcake through the crimper after stamping. Yellow is her favorite color, so I used daffodil delight. The letters are die cut from SU's letter die on yellow polka dot paper as is the cupcake frosting. The black 4 is from Avery Elle's Count On It

The window was made with the Heart's a Flutter scalloped heart die. The banner die is cut from vellum and embossed with gold embossing powder. I used the pull it words from PTI's Movers and Shakers stamps.

When you pull the ribbon behind the beauty... lo and behold! There's Princess Campbell with a star-studded wand and a jeweled crown! I sponged yellow ink on the white card stock under the plastic sheeting. 


Now to the pirate! I made a pirate envelope for the card... not to mention our gift was a pirate ship you can use as a playhouse! Happy birthday, Cami!

Mom

My mother will be 90 years old on September 24th. Things have not been easy for the past two years. She has had several strokes and is in a nursing home in CT. She is confined to a wheelchair, suffering from more and more bouts of dementia. Her care is considered to be "comfort" care, quite a misnomer. 

For her birthday, our three children chose different times to visit so as not to overwhelm her. What wonderful children we are blessed with for sure! No one lives within an hour of her, so it requires scheduling.  As busy as their lives are, with young children, spouses and jobs, they are considerate of that fact! I am so proud of each and every one of them!

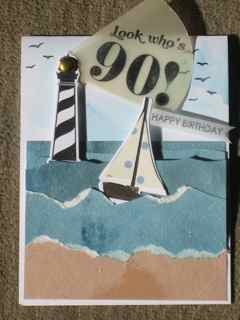
Back story is that my mother has always loved the ocean. For the several years before her stroke, I always tried to take her to the shore for a "birthday celebration" sometime in early September. We would plan an overnight together. These are some of my fondest memories with my mom. Sometimes my sister would find time to join us, if not just the two of us would go; Maine, Cape Cod, Rhode Island. So my card for her celebrates those birthdays by bringing the ocean to her....


SU's Crumb Cake was torn for the sand, my own blue watercolor paper for the water, (see The First Day Of School post) cut in strips to show different colors from the same sheet. The lighthouse has a brad that holds the gold vellum. It can move up and down. The little sailboat attached with foam dots has separate sails in DSP. The foam on the water was created by tearing the paper.

SU's Up, Up and Away birds are flying in the sky, sponged with Distress Broken China ink. The lighthouse is from Wplus9 Guiding Light stamp and die set; the sailboat is from PaperSmooches Wicked Nautical stamp and die. Avery Elle's Count on it  was used on the guiding light.

Looking at it makes me think of the stormy seas that are directing her path right now, but that guiding light is still shining in her direction. Really directing us all!

My Sister

My sister is destined for sainthood, ...really! She is a one-of-a-kind. I have always been blessed to call her sister... So for her birthday here is my card for her:


Her favorite color is pink and SU's Just Believe is a perfect match for her. I used a pink DSP for the bottom portion and splitting the image into 3 segments: past, present and future - makes me think of our lives together.  I "painted" the stamp with Blushing Bride, Pear Pizzazz and Always Artichoke before lightly spritzing. Then I stamped on a heavy weight white paper before dividing the paper into three sections.

Three hearts pull the whole sentiment together on SU Crumb Cake.

Match that up with a bottle of her favorite white merlot!  Happy, happy birthday Judy!


Magic Window!

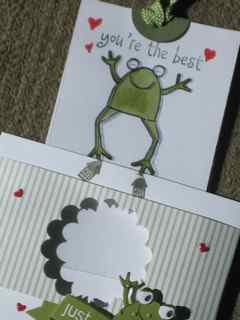
Magic window cards just intrigue me! As soon as I saw this video,  Magic Birthday CardI thought of SU's Unfroggettable set. So I tried my luck... although these are cards that don't open, I think they are fun! Here's they are:

You're unfroggetable...

I followed the directions on how to make this magic window card from here-  Magic Birthday Card and just changed a couple of things to accommodate my punches. I used SU's Always Artichoke and one of my first tries with Copics (YR15, 16, 18 and blender)  to color the mushrooms and snail.


I used the scalloped edge to make a strip to separate the top of the card. This card does not open, it has a pull up tab only.  The sentiment and note will go on the back of the card. The window is a plain plastic sheet with a ribbon attachment to pull up for the surprise frog.


And you're the BEST! 

I used SU Old Olive for these frogs. I again colored with Copics for the mushrooms. The frogs are all embossed with small dots and have googly eyes with Crystal Effects to make them shine (and stick better). The DSP for the front panel has a few little hearts, also with Crystal Effects and the scallop punch for the magic window. I used the "pull here" stamp from PTI's Movers and Shakers stamp set for the direction of the window. 


I used Simon Says Tilted Banners Stamp and dies to emboss "just saying thanks." The little frogs are all attached with dimensionals. Aren't they so cute?

The little hearts are from the Simon Says Falling Hearts die.


Love the way this card came out... Can't wait to use them!

 Update:

9/22- Just sent this to a friend that sent a note to my mother catching her up on their family news. It was such a wonderful, thoughtful thing to do that I will never forget what it meant to Mom! She smiled for the first time in days...  Thanks Lenilyne!


Early September Birthdays

Growing up, September was always the birthday month because half of the family had September birthdays.  Here are the early cards that I made:


My brother has a birthday on September 3rd, he will celebrate 71 years! I am not so excited about this card, although I love the candle diecuts from the dotted paper. I embossed the tips with gold and covered them with crystal effects to shine. I used both dies for the words one in each color to highlight the sentiment. The inside sentiment was "more candles means more wishes..."


I almost feel like there's too much going on with the cupcake embossing on the top layer. The baker's twine is holding SU's Pretty Petites sentiment on the punched shape that matches, Happy b-day. I sent the card because it is bright and cheery, but I wasn't entirely happy with it and ran out of time! Does that ever happen to anyone else???


I kind of felt the same about this card for my sister-in-law,  Nancy. She is 68 this year and just retired to SC. I was trying a new technique spotlighted by Jennifer McGuire on YouTube  that is here Die Cut Inlays. I did make my own design with the scraps from the happy birthday DSP and used it to cut both words. I set the card on Crumb Cake and then on a white base. Adding the embossed pieces of the cupcake from SU's Create a Cupcake helped, but it isn't my favorite card for sure. 

Some things that I did learn: I will use that puzzle technique with the word dies again some time and will make my own envelopes with We R Memory Keepers envelope maker. Love it! 

First Day of School

I just love the first day of schoo... always have... always will! So when the grandkids start -whether it's preschool, kindergarten or second grade -  I love to wish them well with a card. And all eight are in school this year! Here is this year's card:


The card base is SU's Not Quite Navy with an embossed layer of Midnight Muse separated by a white gel pen line, and then the "water layer" which I made on watercolor paper with Distress blue inks- Broken China and Faded Jeans. I saw this video by Kristina Werner on YouTube about this technique Live Friday Focus ... love how the paper came out! I also used some Liquid Pearls to give the water a shiny layer.

The fishes are from SU's Very Phunny and another random fish set that was in the dollar bin years ago. Wanted the mirror image for the fish with the dialogue bubble. Disaster! I just have a hard time doing that! After numerous attempts, I finally got one that would at least give the idea...  The sea grasses are stamped in SU's Wild Wasabi. The little hearts are from the Simon Says Falling Hearts die that I used on another project saving the hearts in real red and covering with Crystal effects.  The word die "happy" is also from Simon Says.

Here's another version:


 The inside sentiment is embossed with white:


And so another school year begins.  As much as I enjoyed teaching... I just LOVE retirement!

August Birthday

For almost a year I have been tutoring a middle school girl in reading for close friends of the family. The work to me is my way of giving back something to a career that I loved. Kierstyn will turn twelve at the end of August, entering into those very tumultous ages that I remember so well! Here is the card that I made for her...


First I stamped the tree with SU Early Expresso; then using Distress Ink's Broken China, I sponged the front of the card making cloud shapes on the edge of a scallop diecut. Next I stamped the tree again on another piece of white cardstock, also sponging Broken China as an overlay for the zipper die. 

Marking where the zipper would go, I stamped the sentiment which says, Pretty darn amazing! and lined up the edges to blend in with the tree. Then I colored in the leaves with SU Always Artichoke, also fussy cutting some leaves to add to the tree with foam dots. I love how they add dimension!


I just love this little guy, also using dimensionals for his glasses and lifting him as though swinging from the paper!  The bananas and his shirt are in SU Summer Sun. The stamp sets that I used were Avery Elle's What's Up? and PTI's Inside and Out II and PTI's Zipper die to create the zipper layer.

The tree connected almost seamlessly to the front layer of the card. The inside sentiment says "Happy Birthday." It was so much fun making this card that I am planning to use the zipper idea for Halloween cards as soon as I get some "playtime" with my stamps!

Tuesday, July 30, 2013

Sympathy Cards

The most difficult cards for me to make are sympathy cards. It is always so hard to put the sadness aside and think of a way to send hugs to the friends and family that are going through such a difficult transition. Because I needed a card for such an occasion, I made a few to have on hand.


Our daughter and her husband have a dear friend that recently lost his younger brother. My husband and I both feel such a closeness to this guy and wanted to send a card. Here is my attempt at trying to relay our sympathies to he and his family...


I used SU Very Vanilla for this card. The second layer is dry embossed with the curly folder. The picture could have been better to show the embossing!  The top layer is stamped with SU Thoughts and Prayers, colored with Early Espresso, Melon Mambo, and Pear Pizazz. Each flower has a small pearl adhered with crystal effects.  The sentiment is Hero Arts CL342 and stamped with Early Espresso ink.  The inside sentiment is from the Thoughts and Prayers set and was perfect for the way we were feeling. All of the edges are rounded with the Corner Chomper. I really liked the effect of keeping the Very Vanilla  for all three layers. 

Here is the other card I made from the same stamp set:


As you can see I basically followed the same idea, just changing up the center stamp and here I added some adhesive ribbon from American Crafts to match. The three adhesive pearls from Martha Stewart are under the sentiment, which is also from the Hero Arts CL342 set. Because I liked the simplicity of the card and the sentiment, I made a couple of others to keep on hand.


Tuesday, July 23, 2013

Thinking of You


My husband has a friend that is in the hospital with a rare condition that has him paralyzed from the neck down, unable to speak or move. Denis has been this way for over four months now. He is about our age and it happened so suddenly, although we do not know he or his wife very well. It is at times like this that I am so very thankful for the many, MANY blessings in my life! 

I was thrilled when John asked me to make a thinking of you card which is below:


I used the WPlus9 Guiding Light stamp set with dies. It is on SU Crumb Cake, with a watercolor paper for the water and also for the sky. I used Distress Inks, Broken China and Faded Jeans mixed with Perfect Pearls Mist, to "paint" the water, ripping the edges to look like the ocean foam on the rocks. I tried to get a picture to show it, but this is the best I could do!


I used just the Distress Ink blues to sponge the sky, with some Distress Wild Honey for the edges on another piece of watercolor paper. The gold light in the lighthouse is a Recollections gold rhinestone. Love how it looks here...The die cut rocks are layered in the front with foam glue dots as are the heron, pilings, and cattails. I used SU Basic Grey for the rocks and Staz-On Black for the lighthouse.  You may also recognize the birds from SU Up, Up and Away.

The sentiment from Hero Arts CL324 is on a strip of vellum cut to a banner, and the sentiment inside says, "sending you sunshine"  from the same stamp set. I hope that Denis and his family feel that guiding light on these dark days....


More Anniversaries

My brother and his wife have been married since July 25, 1964... 49 years this year. I remember it as a bridesmaid... I was 13 at the time. Her mother made all of the dresses for the entire female wedding party... hard to believe! There were five bridesmaids, including the maid of honor. It was such a beautiful day and the wedding was lovely...

Here's my card for them:


The card is one layer on white. I scored and masked a 1-inch space for the sentiment. Then I stamped and masked several flowers from the WPlus9 Fresh Cut Florals with multiple colors. I rounded the corners with the Corner Chomper and stamped the sentiment with Hero Arts CL342. It went very quickly and I love the Fresh Cut Florals although I didn't use the dies for this card.

My next anniversary card is for my daughter and her husband for their 6th anniversary. 


Stephanie and Chris have been married six years and are the proud parents of two adorable girls. This is a picture from their wedding dance... looking through the window. The colors of the house are patterned from their new home. It is retired SU Bordering Blue with Black shutters and windowbox. The Madison Window die was perfect for my vision of the happy couple.

The WPlus9 Fresh Cut Florals stamp set and die was used with all SU colors, and then layered with dimensionals to provide a 3D look. The sentiment is from Hero Arts CL342 in Staz-On Black ink. Inside the sentiment says - Hugs and Kisses.