Pages

Wednesday, January 1, 2014

A Whole New Year

Hard to believe... 2014! The year starts off with our youngest daughter's birthday...  She has always loved the mountains and the snow and coming home for the holidays. This year when she came with her family, she really needed to feel us wrap around her, and we did... It was wonderful! 

Here's my card for her-


The swing card is a favorite of mine, although I wanted to make it bigger than the last one. This card is about 5" square when it is closed up. The paper measures 5 x 9 at the onset.  The card base is Neenah solar white 110 lb. The next layer is a cloud pattern paper that has been around forever.

The trees are PTI's  Evergreens die- cut in SU's Always Artichoke and Old Olive, Dazzling Details is added to the tops of the trees to add some shine. The Lil' Inker snowflakes are cut from glitter paper.  There are actually three - four layers of trees on the front of the card. Then there is one on the two sections of the bottom. I was afraid it looked to bare, but in reflection I think it helped to emphasize the sentiment! 

The sentiment is embossed in white. In the picture it is difficult to read but says... " Sending Warm Wishes of Happiness and Cheer"  and on the inside... 


..."and everything you need for another amazing year!" I decided to add three hearts from SU's Hearts A Flutter embosslits.


Happy birthday, Stephanie... Truly blessed, we are!


Saturday, December 21, 2013

Christmas Card Gallery

Here they are! Next year I will start earlier... next year I will start earlier...


John asked me for three cards for his golfing buddies- he had gotten pictures to share with them. I just love when he asks me to give him cards. I guess I don't embarrass him with my cards :)  I am still feeling a bit unsure about my creativeness... So this is the first one that I made...


SU Crumb Cake is the base for this card. The Lil' Inker snowflake die is cut in silver glitter paper with a jewel in the center attached with foam squares. SU Poppy Parade paper is over a patterned red striped paper. The final touch is the white ribbon. The PTI sentiment is embossed with white embossing powder. Inside is stamped "Merry Christmas" in Poppy Parade. This card was not difficult to mass produce :)


This card is cut with a circle die and then the white layer is embossed with the snowflake embossing folder.  PTI's Rustic Wreath die was used to cut two wreaths, one in SU Always Artichoke and one in a matching DSP pattern. The two are then woven together and glued around the circle. The sentiment  "From Our House to Yours Merry Christmas" is stamped with red on vellum and then embossed with clear sparkly powder- then attached to the back of the front. I added another wreath to the other side of the vellum - I don't like the unfinished look without it!

Three glitter snowflakes, white ribbon, red dotted ribbon and some red small circles are attached to the wreath to finish off this card. The inside sentiment was embossed with white ... "and a Happy New Year!"


This happy fellow is so pleased that we did in fact have some snow at Christmas when the family came home. These are PTI Snow  stamp and die set, SU Cold Play and SU Perfect Presentation stamp sets ... and the glitter paper snowflakes added the perfect touch! It always makes me smile to see how placing the smile and carrot nose can change the whole sense of the card!


This card was so fun to make! I used PTI Polka Dot Parade #9 stamp and die set to make the tree. When the card is closed, the tree comes together. 

The die is actually cut three times, whole on the white front of the card, on patterned paper and SU Always Artichoke. To assemble the tree, a patterned layer was glued to the space between each layer on the white card, leaving the cut to show through the card. Then a green layer was glued on the inside of the card to match the openings, so when the card is closed you can see how the tree comes together. 


The PTI Merry sentiment was a clever idea from Kristina Werner's blog... The stamping is actually two generation stamping in the same color, and then embossed in white on the same color paper. The paper is put over the middle sentiment with foam squares. Love the look! The embossed snowflakes on the card were a detail I probably could have done without,  but the bling was needed with the snowflake!

The inside sentiment says SU  Merry Christmas ... the words " from our house to yours" are divided between the layers of green inside the card that are hidden when the card is closed. 

I made 50 cards from these four patterns and had such a great time, although the time crunch gets me every year! Next year, I will start earlier.... next year, I will start earlier...

Friday, December 20, 2013

Grandkids Christmas Cards

Christmas is such a fun time for the kids! The grandkids get cards that are reflecting this wonderful season through a child's eyes...


Santa and Rudolph are peeking in the window at each house... The pictures on either side of the windows come from Shutterfly orders on the beginning page and I save them for projects just like these. Kodak used to give a thumbnail of every one that you ordered but now you can only get the first and last picture from the order. The colors are SU Always Artichoke and SU Real Red.

The window die is cut through the card base, then a piece of plastic is used before the window is attached. Googly-eye Rudolph, from the SU owl punch, is actually attached to the plastic so he stays on the window when the card is opened. I used the SU Stocking Punch and stamp set to create the stockings hanging with clothespins. Santa is on the inside with the sentiment and snowflakes from silver glitter paper. 

The garland is made with PTI's Rustic Wreath die cut open, one in DSP and one in Always Artichoke. Then I wove them together for extra strength!


Love the PTI sentiment  "It's the most wonderful time of the year"   and  SU Merry Christmas!


Monday, November 25, 2013

Thanksgiving Cards

While I don't usually send cards at Thanksgiving, I did send one to my mother at the nursing home and one to a friend who could use a positive mailing. Love the PTI Gobble, Gobble stamp and matching die set...

Here's the cards:

Love the sentiments stamped around the outside of the card. The acorns are from the SU Autumn set and fussy cut to complete. I used the white pen to outline the tips of the tail feathers... maybe I have been watching too much Kristina Werner, because I really didn't need too! I used SU chocolate chip for the base, and a polka-dotted orange first layer under the pumpkin pie top layer.


I like the cream color so much better than the orange on the mat. The DSP is from SU in chocolate chip.  The mat is die cut from Lil Inkers and I really love the look! I made the tail feathers with Distress inks and water, then die cut the shape. Love the random look of the gobble in orange, first and second generation prints. Twine finishes off the acorns across the bottom of the card.

Oh my! I haven't started my Christmas cards yet... happens every year!


Tuesday, November 12, 2013

Emma Rose is 8!

So hard to believe that Emma Rose will be eight on November 19th. She is really amazing and I just couldn't be more proud of her! Emma has always had a special affinity for My Little Ponies and now Equestria Girls... So I tried to add that to her card. Not my most successful addition... But my heart was in the right place :)

Here's the card...


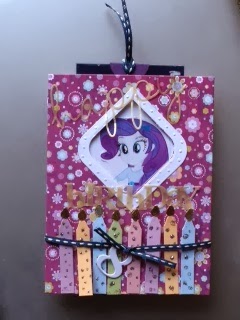
Rarity is the name of the pony... which transforms into a girl.  This is another Magic Window card, with Rarity showing in the plastic window. The words "happy birthday" were diecut on gold vellum (hard to see in the picture). The base of the card is a patterned heavy cardstock with raised flowers. The added 8 candles are die cut with the tips embossed with gold embossing powder to look as though they are lit, then attached to the base with foam squares. I used Silver Stickles to make dots on the candles to match with the paper.

The ribbon has an "8" die cut and tied in the center, matching the pull at the top of the card to reveal a surprise when pulled up.


Rarity transforms into Emma by cutting and inserting Emma's picture to match the image on the front. The letters for her name and age are diecut using the patterned paper from the card base. The whole "Not Quite Navy" piece was then covered with Crystal Effects to give added shine. The heart-shaped bling in Emma's hair added just the right touch! 


The back of the card has a little embossed gift card from Simon Says Stamps die Circle Card Border, "Love U" was gold embossed from the matching stamp set. The clasp in the front was diecut with Avery Elle's rounded diamonds.  Inside is...


... an envelope (die cut in vellum) from SSS small envelope die which is holding an iTunes gift card! Love how that worked out! 

So I guess while this isn't my favorite card... I am hoping that it makes Emma Rose, my little artist granddaughter... smile!


Friday, November 8, 2013

November

We have two November birthdays on our family, Avery Neal will be 3 years old and Emma Rose will be eight! Avery is really into Doc McStuffins and Emma is fascinated with the Equestria Girls! So my task was cut out for me...

I knew I wanted to do the Magic Window Cards for both girls. Trying to get the logistics of how the card could work with their faces in the characters was tricky for me. But here's what I ended up with...

November 4th for Avery Neal:


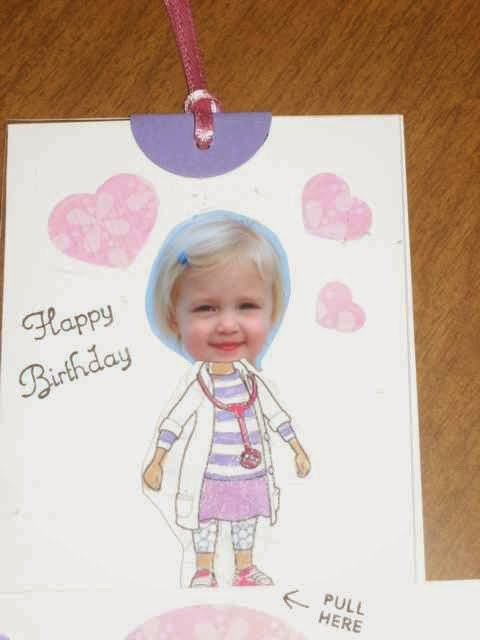
I followed the Magic Window card pattern. After cutting the window I inserted an image of the Doc from the web, separating the head and gluing it on the white paper inside the window. The body I colored and glued to the inside of the plastic overlay so it would match up with head of Doc McStuffins when the card was closed and...

Avery's face which was on the white inset connected under the plastic sheet by the ribbon, when the card was opened.  Crazy right? The next picture shows what the card looks like when extended on both sections. The line on the picture is actually the plastic when it is pulled all the way up. 

Because the image was bigger than the original Magic Window card insert, this insert is longer, 2.75" x 4" which made it fit perfectly! Avery was over the moon with excitement about the card! Almost as much fun as her present... almost! The cupcakes are from SU's Create a Cupcake stamp set and punch. The frosting is on vellum and a little bling star is on each of the three candles. Again I used the alphabet die from SU and the number die from Avery Elle's Count on It for the sentiments, along with PTI's Bigger Bloom's "Best. Day. Ever."

The card is closed at the bottom with three purple flower brads. Because this is a card that doesn't open, we wrote our message for Avery on the back. My next post will be Emma Rose's Equestria Girls!


Saturday, October 26, 2013

October- Happy Halloween!

No October birthdays in our family... but there is Halloween! Love to make Halloween cards because the grandkids love them so much!


Our eight grandchildren live far enough away that we don't get them to trick-or-treat... so I add the treats in my cards! As a matter of fact- we don't have ANY trick-or-treaters, being a bit off the beaten path. I also send a card to Mom just because she gets a smile out of mail...


Here's one of the eight grandkid cards ...


There's a lot going on with this interactive card! I used the SU Booglie Eye stamp set for the cute little characters, PTI's Mighty Oak stamp and matching die for the tree and Movers and Shakers die and zipper die with the embossed white pull stamp. Notice the little eyes peeking out from near the witch?


When the arrow on the bottom is pulled out, the three trick-or-treaters move across the card and out pops BOO! with a hidden googlie-eyed bat! 

The top has an embossed white arrow with a pull direction too. It works with PTI's Zipper die which I used on DSP.  It has a hidden message underneath which says, "Trick or Treat" or it might say "Halloween is a Hoot" depending on the grandchild! 

The inside sentiment is Happy Halloween embossed with gold embossing powder.

I made eight different cards using the same design, so each message was a little different to give each kiddo a surprise opening. The response from them has been fantastic! I also used some inexpensive Halloween paper to make envelopes with my new envelope maker... So fun! Here's a quick look at 5 of them...


Next... Here is the card that I sent Mom...


This is a Fancy Fold card which gives three panels.  This is the card closed. Although I have used this design before, I changed the dimensions for this card. The base is 4.5" x 10.5", scoring each end at 1.75", 3.5" making the card just a little smaller than Lyla's birthday card (my June posting). 


The front face - First layer ...I added a 4x3 black panel on the first flap, then a DSP, and the Madison window in black with the opposite DSP underneath it. The corner spiderweb is embossed on vellum with the Booglie eye spider, colored with Black Wink of Stella pen. PTI's Trick or Treat die is attached to a piece of vellum. The picture is ok, but way more impressive in real life!


Here is the opened card, showing all three panels. Different Halloween patterned papers cover the panels and then Halloween Hoot stamp set and fussy cut the pieces on the card. Sorry the pictures don't do it justice... 


The sentiment is gold embossed on the black base, and the witch is colored with markers and my new favorite Wink of Stella pens!


The stamp set is SU Halloween Hoot and I just love the witch with the ability to have her carrying signs, the broom or the owl! She also appears on the envelope front... Happy Halloween!