Pages

Tuesday, May 21, 2013

Thank Yous

One thing I have shared with friends is the belief that when I give a gift, it comes with a "no need to send a thank you note" guarantee.  Funny that I should end up loving to make cards, right?

So I don't usually send thank you notes to family. This year however, I decided to send them for the lovely Mother's Day gifts that were given to me. Here are the cards:


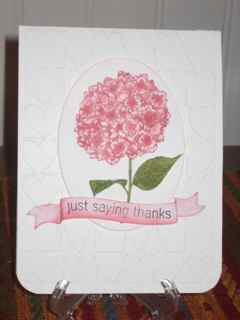
This pink hydrangea from SU's Because I Care set reminded me of the one that was my Mother's Day gift! It was so appropriate for the occasion and came out just the way I envisioned it in my head. I embossed the card base with the hearts embossing folder, stamped the hydrangea on another oval and pop-dotted it to the base. Colors are blushing bride, melon mambo, and old olive on whisper white cardstock. 


The tilted banner was sponged with melon mambo to add depth and fit perfectly at the bottom of the oval. I added the leaf and a few flowers with dimensionals after fussy cutting them and it did make a huge difference to the look of the card.

This thank you is a one layer card with some of the smaller hydrangeas in SU's set Sweet Summer. I used melon mambo and gumball green for the colors, with blushing bride for the lighter pink shade. I used Liquid Pearls spray on the pop dotted flowers to make them shine with that pearlized look. 

This thank you is also a congratulations for my daughter who just completed her Masters Degree work, along with being a fantastic mom to Campbell, 3 , and Lyla, 1! Amazing! I used the SU Eastern Blooms, and my favorite fromtilted banners die, with sentiments from my new PTI set!

In this side view it is easier to see the raised banner and the partially embossed card base. My first try with that technique, and I love the look! Also used some sticky backed ribbon that looked great with the cameo coral, chocolate chip ink  that I used. I sponged the layer with the blossoms with distress ink, peeled paint, added some little pearls to the center of each blossom, then finished it off with my corner chomper!

Tuesday, May 7, 2013

Mother's Day Cards

My mother is just amazing... I am so fortunate to have had her wisdom and experience as a guide for all of my life. In her last few years, life has not treated her kindly with strokes and immobility. I wanted to send her a Mother's Day card to brightened her spirits and make her smile, and I think the hummingbird will do that...

Although I got the initial inspiration from a card on Pinterest, this card is a collection of many ideas I have gathered. I have been anxious to try some new stamps and ideas out... Today I had time to do just that!


Starting with my new supplies of 110 lb white paper, I used the SU Hearts A Flutter framelit for the opening with the sentiment stamped inside the card. I used my new PTI set, Happiness in Bloom , and SU Best Blossoms, for the flowers and two of them overlap the opening and are layered with dimensionals. The love die is from PaperSmooches and I just love how it went over the opening in the card with the sentiment showing through. It's a little hard to see in the picture,  the side view shows it better. 

This view shows the dimensionals under the layers of flowers and the "love" die cut across the front of the card.


I added the hummingbird from the SU Amazing stamp set on watercolor paper and painted the colors to resemble the ruby-throated hummingbird from our area. We were actually treated to our first one yesterday!

Colors were Melon Mambo, Daffodil Delight, Pacific Point and Old Olive; I also used the leaf framelit with the dimensionals on the two flowers that were layered. The envelope is dressed up to match with "Happy Mother's Day" and two flowers.

As in the past, I send Mother's Day cards to my daughters and daughter-in-law. They are incredible young women and I so admire all of their hard work as mothers to our grandchildren. Truly remarkable!

Monday, April 29, 2013

April Baby

My son's sister-in-law just had a new baby boy! So exciting...  she and her husband now have three sons. Griffin... a new brother for Cole and Hunter, and new cousin for Carter, Mason and Avery- the single girl in the mix!  Here's my card...


The Wild About You SU set, one of my favorites, as I have been looking forward to trying the technique of popping out the elephant's ear and the little lion's mane. As usual, I got the idea from a card on Pinterest.  I hope the picture shows how cute it looks! One thing I didn't do though, was to add another layer to the lion with his face. Next time...

I used a piece of speciality paper that I've had for scrapbooking with "brother" and it was off-white so I layered the naturals white mat over the white card base. The ink is daffodil delight and marina mist with matching ribbon. I used the small heart from the owl punch with crystal effects to give it added pop (an idea from Kristina Werner) and added dots around the stamps before I layered with marina mist. I also punched a spot on the side of the card for the ribbon and it did help it lay down to attach easier  (idea from Julie Embersole). The giraffe and welcome little one stamp on the envelope were the finished product! 


Thursday, April 11, 2013

April Birthdays

Both of our sons-in-law have April birthdays, although a week apart. We just couldn't be more blessed with the husbands of both of our daughters... they really are like sons in the family!  Here are the cards that I made to celebrate each of their special days...

I took this design directly from Pinterest knowing how much Chris loves to play his guitar. I changed it up in very minor ways, really just copying the awesome design... I used thread for the strings, and brads to hold them down. The crumb cake color was enhanced by shading with distress ink, wild honey. I also used the happy birthday stamp from an SU stamp set.


The inside and the envelope both used a little star from a random set, but it was my first try with chalk ink. I love it and can't wait to try the bold colors again. They are definitely on my wish list for new supplies!


Steve's birthday gives me another golfer so I used the design from February. Again it is almost an exact copy from a Pinterest card and I used DSP paper for the first card layer and built the landscape from there. I used the small dot embossing folder for the golf ball and embossed the sentiment with white to add a little texture to the card. 


I also have a good friend with an April birthday, sent a card but forgot the picture... Oh well! I will remember next year...


Friday, March 15, 2013

Getting Ready for April

Our grandson Thomas, will be 3 on April 2! He is such a treat to spend time with, never know what he's going to come up with. I do know that he is such he can do anything his big brother Will can do, and that includes Legos. So his card is a Lego 3!

It is difficult to see the embossed cupcakes in the background- another favorite of Thomas! The Lego blocks are made with 1 inch and 1.5 in rectangles and backed with black. The dotsa re made with a hole punch and put on with dimensionals that are cut very, very small! I read on a blog recently that Kristina Werner uses folded glue dots for the same effect. Believe me, I will try that next time! My favorite Curly Verses add the sentiment for Thomas's card.

Easter

I had grand thoughts of Easter cards with bunnies this year, but it didn't happen! I even had one almost together, with ears that flop up, but maybe next year! I did make a card for Mom to send with an Easter greeting however...


I used the SUJust Believe stamp set on Crumb Cake with Real Red as the coordinating color with ribbon to match. The idea came from a card I saw on Pinterest. One of the things that I love about Pinterest is the ability to case other cards and just change something to feel like I really could do something like that!  I added the brads and popped up the sentiment to add some dimension to the design. I love how this card came out!

Birthdays

The beginning of March always puts in mind - SPRING! By this time we are so ready to see the beginning of the next growing season hidden under that blanket of snow!

Jessica's birthday, on March 21st began our journey as parents. We have been so blessed for sure with Jessica and the REAL start of our lives as a family.  And in some way I wanted to share that sentiment with my card.  


This is a closed front view of the flip/flop or swinger card. I used the Mixed Blossom SU stamp set and punch along with Just Buzzin By SU stamp set. The colors are Daffodil Delight and Ballet Blue. The cover is embossed with the honeycomb folder on the front and the small dotted swiss on the white. I cut a few honeycomb size fillers from the DSP to add some detail on the cover. The letters are stamped and then filled with crystal effects to look like a real honeycomb. I love the way the edge shows up when the card is opened!


Here are some smaller photos of the other views. I cut the bees and used dimensionals to make them pop up. Because I am OBEE it has an added significance (:  Happy birthday is stamped with curly verses, which I use all the time!  I am still trying to make the opened card look more together and in looking back, maybe should have chosen an orange and chocolate chip combo?