Pages

Wednesday, March 26, 2014

CAS3- Day 11

Use a stamp set 4 ways... There were lots of great ideas on the set used. For my submission to the gallery, I chose the triangles and masking textural effect. 

I really didn't plan to use this one, wasn't sure I liked it. Boy did I change my mind after i tried it!  It is so much better in real life than in the pictures I saw...


It was amazing how easy this was... Now I have to think of some other shapes to get this to work. The one piece that I did differently was embossing each triangle separately. I put the Versamark on and then embossed all with clear embossing powder at the same time.

For some reason the ink looks so textured and I just love it!

CAS3-Day 10

More textural effects for today. I loved the embossing with shims...


PTI's Big Bold sentiments were perfect for this card. It will make a great birthday card for my son-in-law who loves cupcakes! I will try this technique again for sure!

In my embossing materials there are several small folders to do partial embossing. Now have the desire and a little more experience to give them a try... maybe I won't get that darn impression line!

CAS3- Day 9

Textural effects... first technique is the double embossing. I have always wanted to give it a try... 

Here goes my effort...


Because you have to use a die with a solid back, it was difficult for me to find one in my stash. But this will give the idea. I used the dots embossing folder, and filled some with red, blue and silver Stickles. The greeting was perfect for a graduation card. The sentiment inside says, "Happy Graduation!"

CAS3- Day 8

Free hand drawing and Copic Coloring... enough to make me shake in my boots! As soon as I saw those beautiful roses though, I couldn't wait to try! I still want to try again even after how rough these came out.. to make daffodils or lilacs...

Here's my copy...

Because the copics are used on watercolor paper, it was then attached to a card base.  Used distress ink (mowed lawn) to sponge the background... trying to make the roses or leaves look better... Not my best effort for sure! Maybe if I didn't try to make the leaves so big... or so green...

I am not giving up though... just bought some yellow copics to try those daffodils :)


Wednesday, March 19, 2014

CAS3-Day 7

Homework for class was a real challenge for me and going slowly today! The topic is coloring, something I can usually get into!

Here's my Copic coloring on vellum...


Probably because there's been so much of it... and for so long.... and more coming... that I thought of how much our grown daughter loves the first snow of the season. I die cut 3 snowflakes and the word die on the front of the card, used Copic blues on the vellum and attached it to the back. Then I stamped the word first. This card is not my favorite, probably should have gone with 1 snowflake, it would have looked better and taken so much less time!  

Ah well, live and learn... I will still send it to her next year for the first snow of the season... that is - if it ever stops this year :)

Monday, March 17, 2014

CAS3- Day 5 Graffiti

This technique was very new to me, and a lot of fun. I am not sure I chose the best topic though, and will be trying it again. I really was wishing I had a Mom or Mother word die...


This is truly one layer.. I die cut trick or treat and the yellow moon, and inlaid both on the orange card base. The larger Boo! is embossed and the other stamps are in black or charcoal shadow inks. The witch is from SU Googlie Eyes Halloween set. 

I had to use post it tape to hold the inlaid pieces in place, setting them in crystal effects. I am hoping to take the tape off, but will let it dry overnight to see. Think I would have liked this better if I had more Halloween word to use... 

Having tried this now, I'd like to do one for Mother's Day and get a Mother or Mom word die. I have lots of words to use for that card base. I am noticing that I keep coming back to that inlay technique...


CAS3-Day 5 Plaid

Next homework assignment was to make a plaid pattern stamping. So I decided to investigate if the O'Brien name is associated with an Irish plaid, going back to my heritage and name. Sure enough here's what I found...


Kind of cool right? So using my supplies, I came up with this design for my card...


Using the masking technique from yesterday, I masked the center of the card and stamped the plaid outside. Then using straight edge, inked stitches around it and masked it off. Layering flower stamps using the same colors in the plaid, I then stamped the greeting in black. 

Used the PTI Miniblooms set, inks are all SU Gumball green, Tangerine Tango, Starfruit Yellow. This is truly a one layered card though!

Love how it came out, but it was messy! I had ink everywhere... and getting those lines straight... Wish I had centered the rectangle closer to the right, but I intended it to be vertical and it ended up horizontal :)


Love the envelope though! Fun technique...


CS3... Day 5 Iron off

Have I mentioned that I hate ironing? So when CAS3 had the first technique as iron off embossing, I doubted I would ever try it, although it was introduced by Jennifer McGuire and I do love her work...

So the new drapes arrived today and ... yes, you guessed it... they had to be ironed! Now I had no excuse ...


In her example, Jennifer sewed the front of the card to the back to keep it one layer. I felt like I got out the iron, it would be too much to also get out the sewing machine!!! So the watercolor paper is added to the Neenah Desert Storm card base :)

Using the same techniques with Distress inks and clear embossing powder as on the video, the greeting was stamped from PTI Big and Bold sentiments. Ironing off the embossing really is fascinating, especially from the sentiment. If I use this again, I think I will try to mask the rest of the card instead of embossing it, because it was the most difficult part to iron off. 

I am wondering if it would work as well and will certainly give it a try. I think it looks rather plain and will add ribbon or embellishments before I use it. Love the watercolor though!


Sunday, March 16, 2014

CAS3... Day 4

Masking is one of my favorite techniques for cards. I am not so likely to use background stamps though. So this was a fun day in the craft room for me, reminding me of techniques and trying new ones too! 

Here's my first try for day 4's lesson ...


Jellybeans for Easter! I masked off the shape with post it tape and used the lattice background stamp with SU Sahara Sand. The jelly beans are stamped in a variety   of inks and the background is sponged with Distress Wild Honey before the greeting, Happy Easter from Paper Smooches.

Next...

After masking the large rectangle and cutting the center oval as the inside mask, I used PTI's Miniblooms stamp set, to layer the floral design using many SU colors. Then sponged the entire area with Distress Wild Honey to define the edges.


Removing the center mask, I cut the stamp to center the greeting better on the space provided. I like how the script comes off the intended sides on birthday!


Clearly I enjoyed the experience... putting layered flowers on the card inside and a matching envelope. I am intending to use this for my daughter's birthday on Thursday!


CAS3... Day 3

There were so many things that I wanted to try after watching the videos, my mind was full of ideas... I am keeping the sticky notes app on my computer to write them down as I watch the videos!

Here's my take on Day 3...


Seeing the bike that Laura Norris (#115) used from the gallery really helped me... I couldn't get it out of my mind. The lighthouse also appealed to me, because I do have the Wplus9 set with dies. Next time... 

SU's Good Neighbor set is one that I have never used and it worked perfectly with PTI's bike! Again, I used a card base and attached the white layer to it, just in case with the watercoloring :)

I even surprised myself with the results, and the fact that I loved the watercoloring. Why don't I do that more often anyway? 

Thanks Julie, for the great ideas!

Clean and Simple Day 2

Catching up with class since I was away for a few days, was so much fun! Here are my examples...

Faux Metal:


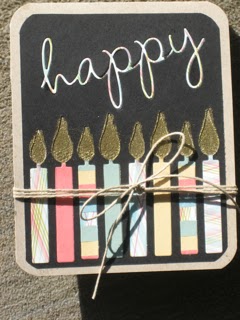
After many (MANY :) failed attempts, this was my final product. The card base is Neenah Desert Storm, with a black layer on top. The candles are die cut into the black and inlaid with patterned, plain and striped paper (made by piecing the strips together). The word "happy" is also inlaid with the same patterned paper as the candles. 

Not even going into what products were used... except for PTI candle dies.

My thought was to emboss the gold for the candles, and use the stamp to give the metal feel. It was very difficult and to tell the truth, I just didn't like it! So here is what I settled with.  The twine was added to make me feel better about it! Ha!

Thank goodness my results for Day 3 were much better!

Monday, March 10, 2014

Clean and Simple 3... Day 1

Here's my first admission to the gallery for the online class... I am having such a great time! Can you tell?


Made this for St Patrick's Day for John... Lucky in Love!  The ideas came from the class... it is a layer on the white card base, inlaid on the layer.  I was a little afraid to go directly on the card to be honest! 

The strip of pattern paper is from Recollections All Seasons. It was adhered to the white layer (5.25 x 4") before die cutting the word lucky through both. Then I cut the shamrock from both layers, replacing it with a green one. The one that was cut is on the inside of the card!  I adhered the 3 extra pieces from lucky to their correct placement on the word, adhering this layer to the white base. Love the inlay technique... I am a puzzler after all ...

I thought of adding more shamrocks, but to be honest, I like the simplicity of it :) But I have learned that I am not a purist!

St Patrick's Day II

Ok... I know... but I had too! After seeing this guy on another card, I just had to have it :)  Here's my new favorite...


As you can see, I also splurged on the stitched circles from My Favorite Things! The PaperSmooches set, A Magical Spring has matching dies including the shamrock! I did cut the stamp and left off his arm holding the shamrock so he'd fit in the circle.

Since I was ordering from Simon Says Stamps for the Online Stamping Class, I added this to the order! The card base is Neenah Desert Storm, with a smaller circle cut. Then the patterned paper from All Seasons, is cut one size large to give a border. The inside of the card, has white cardstock cut with the middle sized of the circle set, which is the largest size I used for this card. 

The leprechaun is colored with Copics. Some of the shamrocks on the front are embossed with small dots, others are plain. The Greeting from Hero Arts CL498 is embossed with gold embossing powder. 

Love it! Doesn't he just look devilish?? 

Thursday, March 6, 2014

St. Patrick's Day

Top of the mornin' to ya... Erin go Bragh! 

Happy St. Patrick's Day! I love to send holiday cards to the kids and grandkids... probably relates to the O'Brien side... (hence the nickname OBee :) and that rich Irish heritage. I may have married and changed my name - but I will always be an O'Brien! I certainly want my children and grandchildren to know their strong Irish background.


I masked off the center of the card for the pot of gold, a technique I saw Kristina Werner use in a video. This is not a one layer card, with a black met. I wasn't sure about the googlie eyes of the leprechaun, so I drew them in on the next one. 

I also added a black line to the top of the white because I felt like it needed something else...


This is a single white on the card base. I added the black outline to draw interest. I need to change those leprechaun eyes though back to the googlies!  

PTI's Luck of the Irish stamp set for inside sentiment and Heart Confetti die was used for the shamrocks. I cut the solid shape from SSS Nautical Border stamp set bending it for the rainbow. The greeting is from Hero Arts CL498 embossed with gold embossing powder. The paper color is SU Crumb Cake , SU Old Olive and Recollections All Seasons Patterned Paper. 

The pot is made from punches (Circle, label) as is the leprechaun ( Circle and scallop). I stamped Versamark on white paper, embossing it with gold before cutting in 3/8" circles for the gold coins. I know for next year I am investing in a leprechaun stamp, I have seen a few cute ones!