Pages

Wednesday, January 29, 2014

Erica's Birthday

For some reason, I am not quite sure why, it can take up to two weeks for my cards to get to my son and daughter-in-law. I wonder if it is because they are handmade, maybe the envelope is a little thicker? I almost always add extra postage. Last year Erica told me she thought I wasn't going to make her one. Broke my heart...  She finally got it weeks later! So this year, I am sending her card very early...

Here it is...


I used PTIs Flipping Out stamp and die set. Erica loves flip-flops, and we will be just returning from a beach week with their family. So this is perfect...

This card is one that I made using the same pattern as I used for Gracie's birthday card in January. Here's the video link for the pattern..  Julie's video.

The SU Crumb Cake card base is 4 1/4 x 10 7/8" scored at 2 1/2 and 6 3/4. The directions are very specific on the video so I won't reiterate, but the circle punch is 2 1/2 and the scalloped punch is 2 3/8.  

The SU Caribbean Blue flip flops are stamped with SU Always Artichoke after the die cut. I used foam squares to add the black strap and the flowers with a rhinestone for added bling! The patterned paper blue is something I had around, looking like water. I used a border punch for the front flap, and attached twine under the pattern paper, wrapping around the back of the card before tying it. 

The sand dollars and starfish are from WPlus9 Guiding Light stamp and die set. The greeting on the front is "Life is better in flip flops!" which is embossed with detail white embossing powder. 


I know that after a vacation week at the beach and the hard reality of getting back into the swing of the normal routine, we will all be wishing we were in flip flops!


I just love how this card came out... It is my favorite flap fold card so far.  Hope Erica likes it as much as I do!   


Aren't we blessed to have a family that wants to spend time with us, to take us on their family vacation?


Gift Cards

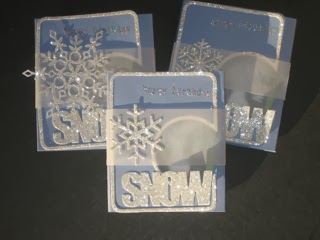
What do you get as a gift for someone that has just about everything?? Well, I took the advice of my daughter-in-law and got gift cards to ski. But then - how to wrap it up?

Enter the Circle Card Border die from Simon Says Stamps! I had no idea how much I would use this die, once I discovered how! Here's the gift cards...


I had to make three. So once I got my idea and measurements, they worked up pretty fast. The original cardstock is 3.5 x 9  3/8 " and then scored at  2 7/8, 3, 6 1/4, 6 3/8. The scoring allows for the tri-fold card to have room for the gift card in a vellum envelope. I folded the card base, which is SU Bashful Blue.

Then with  glitter paper I cut  the Simon Says Stamp Circle Card Border die, marking where the circle would come on the card front and also on the middle panel.  Using the circle die from Circle on a Line (also from SSS), I cut the circle twice, once on the front edge, and once on the middle panel.  

I cut the PTI Snow word die and a Lil Inkers snowflake die also from the glitter paper. The belly band is vellum cut at 1.5 x 9" scored at just about the same spots as the card. 

I tried my new product, Stamp and Bond to add glitter to "happy birthday" from SU Birthday Whimsy.  First stamping the greeting in Versamark, heating the Stamp and Bond to melt, and quickly adding the glitter it went smoothly! I then burnished it with my finger. Next time, I will be sure that the greeting is a little larger in size to show up better, although I was okay with the results. My photo isn't the best to show :)


The gift card is secure in a vellum envelope, cut from SSS Gift Card Envelope die. I cut off the top and used a punch to make a notch to pull it out easily and adhered the whole envelope to the inside of the card. I love how a cow shows through! It's called a cow card from Wachusetts Mountain.


I also got to use my envelope maker to make just the right sized envelopes from patterned paper, since these cards are for a party and don't need to be mailed. I will definitely be using these dies and materials again! 

Sure hope they like them! 


Sunday, January 26, 2014

Valentine, valentines!

I do so love Valentine's Day!  It is the holiday that was always my most favorite when teaching...

Here are the cards for the grandkids:

These are the 8 valentines for the kids. There are different ones for each child. I used SU Hearts A Flutter die to cut the front window, then embossed it in white.  Paper Smooches love die is layered one red and one black; PTI's Tiny Treats for the picture that shows through the windows; PTI zipper die for the Tiny Treats hidden sentiment.


The corners are rounded with the Corner Chomper. Now for the tricky Baker's twine- I attached in under the zipper layer, and then pulled it in the back and around to the front before tying the bow with the name heart. SO to open the card, the twine just slides down and you never have to untie the bow! 

So clever, but really it wasn't the plan- just worked that way!

The hearts are from SSS Falling Hearts die in pinks and red. This cute little bunny is for Thomas, and under the zipper it says ...

"Some bunny loves you! Be my valentine!"

Now the nice thing is that these are so small that they'll fit in the cards for their parents!

Here are the adult valentines...


Again I used the Paper Smooches love die, layered with 4 black and 1 Real Red on top. The stars are from the SSS Falling Hearts die as is the bottom layer, topped with a black ribbon. The inside sentiment with the "you" die in one layer black and a heart from the SU Hearts A Flutter die.

This card is going to all three of our children and their spouses, and to my mother in a nursing home.

Adult card number two has a heart embossed layer on a white card base. The SU Hearts A Flutter die is stamped with SU Real Red on white cardstock. The second layer is cut from the smaller Hearts A Flutter die in Real Red, and the PTI Tiny Treats sentiment is embossed in white. Wink of Stella is on the red hearts for a bit of glitter.

I just love the red and white with black.


It has a simplistic elegance that I like so much better than the picture shows. I am sending one to our neighbor who is in assisted living, and another one much like it to our very close friend, Cathi, who has been going through a very difficult time. 

Wish there were other ways to help friends when things are totally out of control... Helps to make me realize how very blessed I am!


Belated Thank You

After Christmas, I had a visit from a family whose middle school child I had been tutoring for just about a year. We stopped about a month ago since when it became apparent the child was not really invested.  Seemed to me one of us was working a lot harder than the other. After weeks of not doing the reading or even trying to get it started I decided to cancel our time together. I have never been good at enabling!

They surprised me with a lovely dish garden with an orchid, poinsettia and various greens.  I have been remiss in not sending a card. Here is the one I decided on...


It is stamped on SU natural white and the base is also the same. It has flecks of color in the paper, which is different. White snowflakes and greeting were stamped in Versamark and embossed with seafoam white. Using SU inks with Perfect Pearls  mixed in, sponged with Certainly Celery, Summer Sun and Ballet Blue. The ribbon added just the right touch for the base.

The volunteering was good for me, but I need to feel that the work is not only appreciated, but makes a difference. I am hopeful that I can find a way to give back to someone that really could use the reading help. I do think I can make a difference, but the child has to want it too!

Thursday, January 23, 2014

February Birthday 3

The third February birthday is our grandson, Carter Thomas! What a special boy he is... and not just because I am his grandmother! He will be 8 on February 16th and has just this year fallen in love with baseball! His favorite team is the Red Sox, and he is fortunate to have gotten to a few games this year with his Dad!

Here's my card for him....


The base of the card is SU crumb cake with a patterned baseball card paper on a partial layer. PTI's Seventh Inning Stretch stamp set and matching dies were just perfect for this card! The sentiment was heat embossed on red cardstock. The baseball cap was stamped in SU Not Quite Navy with a die cut "B" in red for the Red Sox.

It was a fun card to make and went pretty fast... I even added some Post-it tape to the bat for an authentic bat look!  Happy 8th birthday, Carter Thomas!


February Birthdays 2

So here are the last two February birthdays for our family... 

Our son, John,  will be 37 this year on February 11th.  I always tell him the story of how cold it was 37 years ago.  We had a keep a faucet dripping to be sure the water pipes didn't freeze in town. Much like the weather we are having now I think!

This year, John and his wife are taking us to Turks and Caicos Islands with their family for a week in February... What a treat! 

Here's the inspiration for the card I will be sending ...


My inspiration was Sankaty Light on Nantucket. We took a day trip from the Cape last summer to Nantucket with John and his family. His wife Erica, found all kinds of things for us to do there. We had a fabulous day and it brings a smile just thinking about the kids and what a great time we all had!  Sankaty also has a special meaning to John career-wise, so it was perfect!


The lighthouse was from WPlus9 Guiding Light with a few adjustments to look more authentic. The black section is actually added again with foam squares to give it more dimension, the light actually in Silver Stickles. 

The base of the card is Neenah 110# solar white with Distress inks sponged for the sky (Broken China) and  for the grasses  with Wild Honey, Mowed Lawn. 

SU Pocket Silhouettes and Herb Expressions with SU crumb cake, soft suede, and Always Artichoke make up the grasses. At the last minute I added the birds from SU Up and Away in black ink.  The greeting is from SU Curly Cute.  

Happy, happy birthday John!  We love you and are so very proud of you!


Saturday, January 18, 2014

Valentine's Day

Getting ready for making valentines- I have always loved this holiday... a chance to tell folks how much you love them! What's not to like??

Here's my new one for John....

I just love that floating valentine! I do not have the SU thinlit die but really wanted to make this fold! So I patterned it after the birthday card for Gracie...

Love how it came out, even though it doesn't come out in the photo.


The cardstock is white 110 lb, cut to 5 x 11"- folded in half, 5x 5.5".  I cut the smallest framelit through the middle of the folded card. Now working with only the front of the card, I marked the halfway point, cut another framelit (2 up in size from the original) through only half using a shim. 

Then fold that section back to make the front cut stick out! Soooo cool! Tricky business... I again used a lot of paper getting this right. Now I've got it though!


Then I made some frames by doubling up the framelits with black to edge the opening and hold the baker's twine on the hearts! There are three hearts adhered together hanging on the twine. I love how it worked out! Next using Recollections paper: All Seasons Collection, I cut the sizes to just fit the card.


Now I need to make valentines for the grandkids... FUN!

Thursday, January 16, 2014

February - First Birthday

There are three February birthdays, Valentine's Day and Erica on March 1st! I have a lot to do before our trip to Turks and Caicos...

Here's my first card ... Mason will be six years old! So hard to believe...


Funky Monkey from Avery Elle is just perfect for him! I used SU Close to Cocoa as the base with Cranberry Crisp as the next layer. The two layers of white are sponged with Distress Broken China before adding the banana tree and leaves. I added a few leaves from PTI MIghty Oak to add dimension on the front. Wish Big is from Paper Smooches

PTI Movers and Shakers Zipper die added the tear off zipper strip, which hides the sentiment "Wishing you a wonderful birthday." You can see the pull here arrow direction. 

The monkey is stamped once and then added again with foam squares. Love those shades which are colored with Wink of Stella black! And here's the envelope...


Next birthday is our son John, who will be 37 years old- Mason's Dad! He just recently got his number to run in the Boston Marathon for the YMCA.. and a big, well deserved promotion at work! So proud of him! Need to show all of that in my card...

Wednesday, January 15, 2014

More January Birthdays

Our neighbor's sister in England will be 94 on the 28th! Definitely rates a card...


This is the closed card with a snowflake brad holding it on the left. The idea came from Julie's video here, I started with a 4.25 x 8.5" paper. I pretty much followed the directions on the video although my border punch is different and I used 2 scallop punched papers to adhere to the added paper. 

The snowman is from SU Cold Play stamp set. The glitter snowflakes are from a small punch.  The sentiments are from different sets that I had on hand. I colored the snowman's black hat with Black Wink of Stella. Silver Stickles added a little dimension to the white around the snowman. Happy Birthday is embossed in white on the front.

The inside of the card is left for a note to Gracie. The color is Pretty in Pink with DSP for the first scallop. Here's what the opened back looks like...


We also have a niece that has a January birthday. She will be 34 this year. This card was very difficult to photograph because of its fold. I tried my best but really doesn't show how cool it is for real!


When the card is closed it looks a little crazy... but here it is! The window is open all the way through it. I do not have the SU Thinlit die to cut this design, but I was determined to make the opening! 

I started with a 4.25 x 8.5" 110 lb white cardstock. I folded in half and cut the smallest size through both sides. Then I partially cut through the front of the card with the two sizes bigger SU Label Collection Framelits Die using a shim. After folding it back you can see what I got. I made the other size frames with black and dotted yellow. I don't want to tell how many pieces of cardstock I went through to get this to work!! But I was determined...


As you can the see the front sectional has an embossed happy birthday layer, and the inside has a cupcake embossed layer. I diecut happy and birthday as well as three hearts to add some dimension to the card. The cupcake (from SU Create a Cupcake punch and stamp set) is held in place with bakers twine and appears to be floating. I cut the frosting from glitter paper as well as the light on the candle. The Hearts-A-Flutter, happy and birthday die cuts are attached with glue.

Not sure if I'd choose this again... although I can really see a heart floating for Valentine's Day, can't you?


Wednesday, January 1, 2014

A Whole New Year

Hard to believe... 2014! The year starts off with our youngest daughter's birthday...  She has always loved the mountains and the snow and coming home for the holidays. This year when she came with her family, she really needed to feel us wrap around her, and we did... It was wonderful! 

Here's my card for her-


The swing card is a favorite of mine, although I wanted to make it bigger than the last one. This card is about 5" square when it is closed up. The paper measures 5 x 9 at the onset.  The card base is Neenah solar white 110 lb. The next layer is a cloud pattern paper that has been around forever.

The trees are PTI's  Evergreens die- cut in SU's Always Artichoke and Old Olive, Dazzling Details is added to the tops of the trees to add some shine. The Lil' Inker snowflakes are cut from glitter paper.  There are actually three - four layers of trees on the front of the card. Then there is one on the two sections of the bottom. I was afraid it looked to bare, but in reflection I think it helped to emphasize the sentiment! 

The sentiment is embossed in white. In the picture it is difficult to read but says... " Sending Warm Wishes of Happiness and Cheer"  and on the inside... 


..."and everything you need for another amazing year!" I decided to add three hearts from SU's Hearts A Flutter embosslits.


Happy birthday, Stephanie... Truly blessed, we are!